• Skip to primary navigation
  • Skip to main content
  • Skip to primary sidebar
FamilyandForks
  • Seasonal Pantry
    • Asian Pantry
    • Winter Pantry
  • Vegetables by Season
    • Winter Vegetables
      • Broccoli
      • Turnips
      • Brussels Sprouts
      • Cabbage
    • Fall Vegetables
      • Broccoli
      • Carrots
    • Spring Vegetables
      • Spinach
      • Strawberries
      • Rhubarb
  • Farmers Market Guides
    • Farmers Market Tips
    • Winter Farmers Markets in DC, VA & MD
  • About
    • Welcome

Tabbouleh with Almonds

July 19, 2017 by admin

Sinking into the deep summer days of seemingly unyielding heat that saps any desire to cook at the end of the day,  I find myself again turning to the Mediterranean for a dish that can be prepared in advance and accommodates the heat.  Tabbouleh is a traditional Lebanese dish I almost always order out and thought too fussy to make at home.  I finally gave it a try and am glad I did.

With tomatoes and cucumbers in abundance this time of year, sliced cucumber and tomato salads, and gazpacho are constants so it is nice to add one more dish to a repertoire to make the most of the season.  Tabbouleh is primarily a parsley salad with tomatoes and cucumbers mixed with bulgur wheat.  Quinoa is easily substituted and both just need boiling water to prepare.

I found the key to making this dish successful is salting the vegetables before mixing them into a salad.  So many summer vegetables like zucchini, summer squash, eggplant, and cucumbers are sometimes best if you salt when raw then incorporate into a dish.  It prevents a dish from becoming too watery, which will definitely happen with Tabbouleh after a day.  Salting just entails placing your chopped vegetables into a strainer set over a bowl and sprinkling the vegetables with salt.  Let sit then stir around occasionally.  After about 15 minutes, if you give a stir, the juices will dribble into the bowl and leave the vegetable still crisp.  The bonus is that you can now take these juices and heat them with water to prepare the bulgur, which adds so much flavor.

Premium quality olive oil is your best asset this summer so make sure you have a bottle…or two.  The choices for olive oil is vast and many are poor quality.  When in doubt, the bottle should have on the label a “crush” or “harvest date.”  The current date should be within 6 months of that date.  Many farmers markets now have vendors with their own press of olive oil.   Vordonia Athenolia Extra Vigin Olive Oil is a frequent vendor at the Great Falls Farmers Market, offering pressed olive oil fresh from the family’s olive fields in Greece.

We also have a vendor at the Great Falls Farmers Market, Tyme Foods, who sells an amazing za’atar blend with wild thyme.  I featured it here over the winter but we find ourselves using it even more in the summer for grilled meat and vegetable kabobs.  The pairing of wild thyme with the lemon in the Tabbouleh makes this dish very special and different. *

While adding za’atar is a special touch, the salad is also wonderful without it.  Soaked in olive oil and lemon it is almost thirst quenching and surprisingly filling on hot days when it’s hard to work up an appetite.

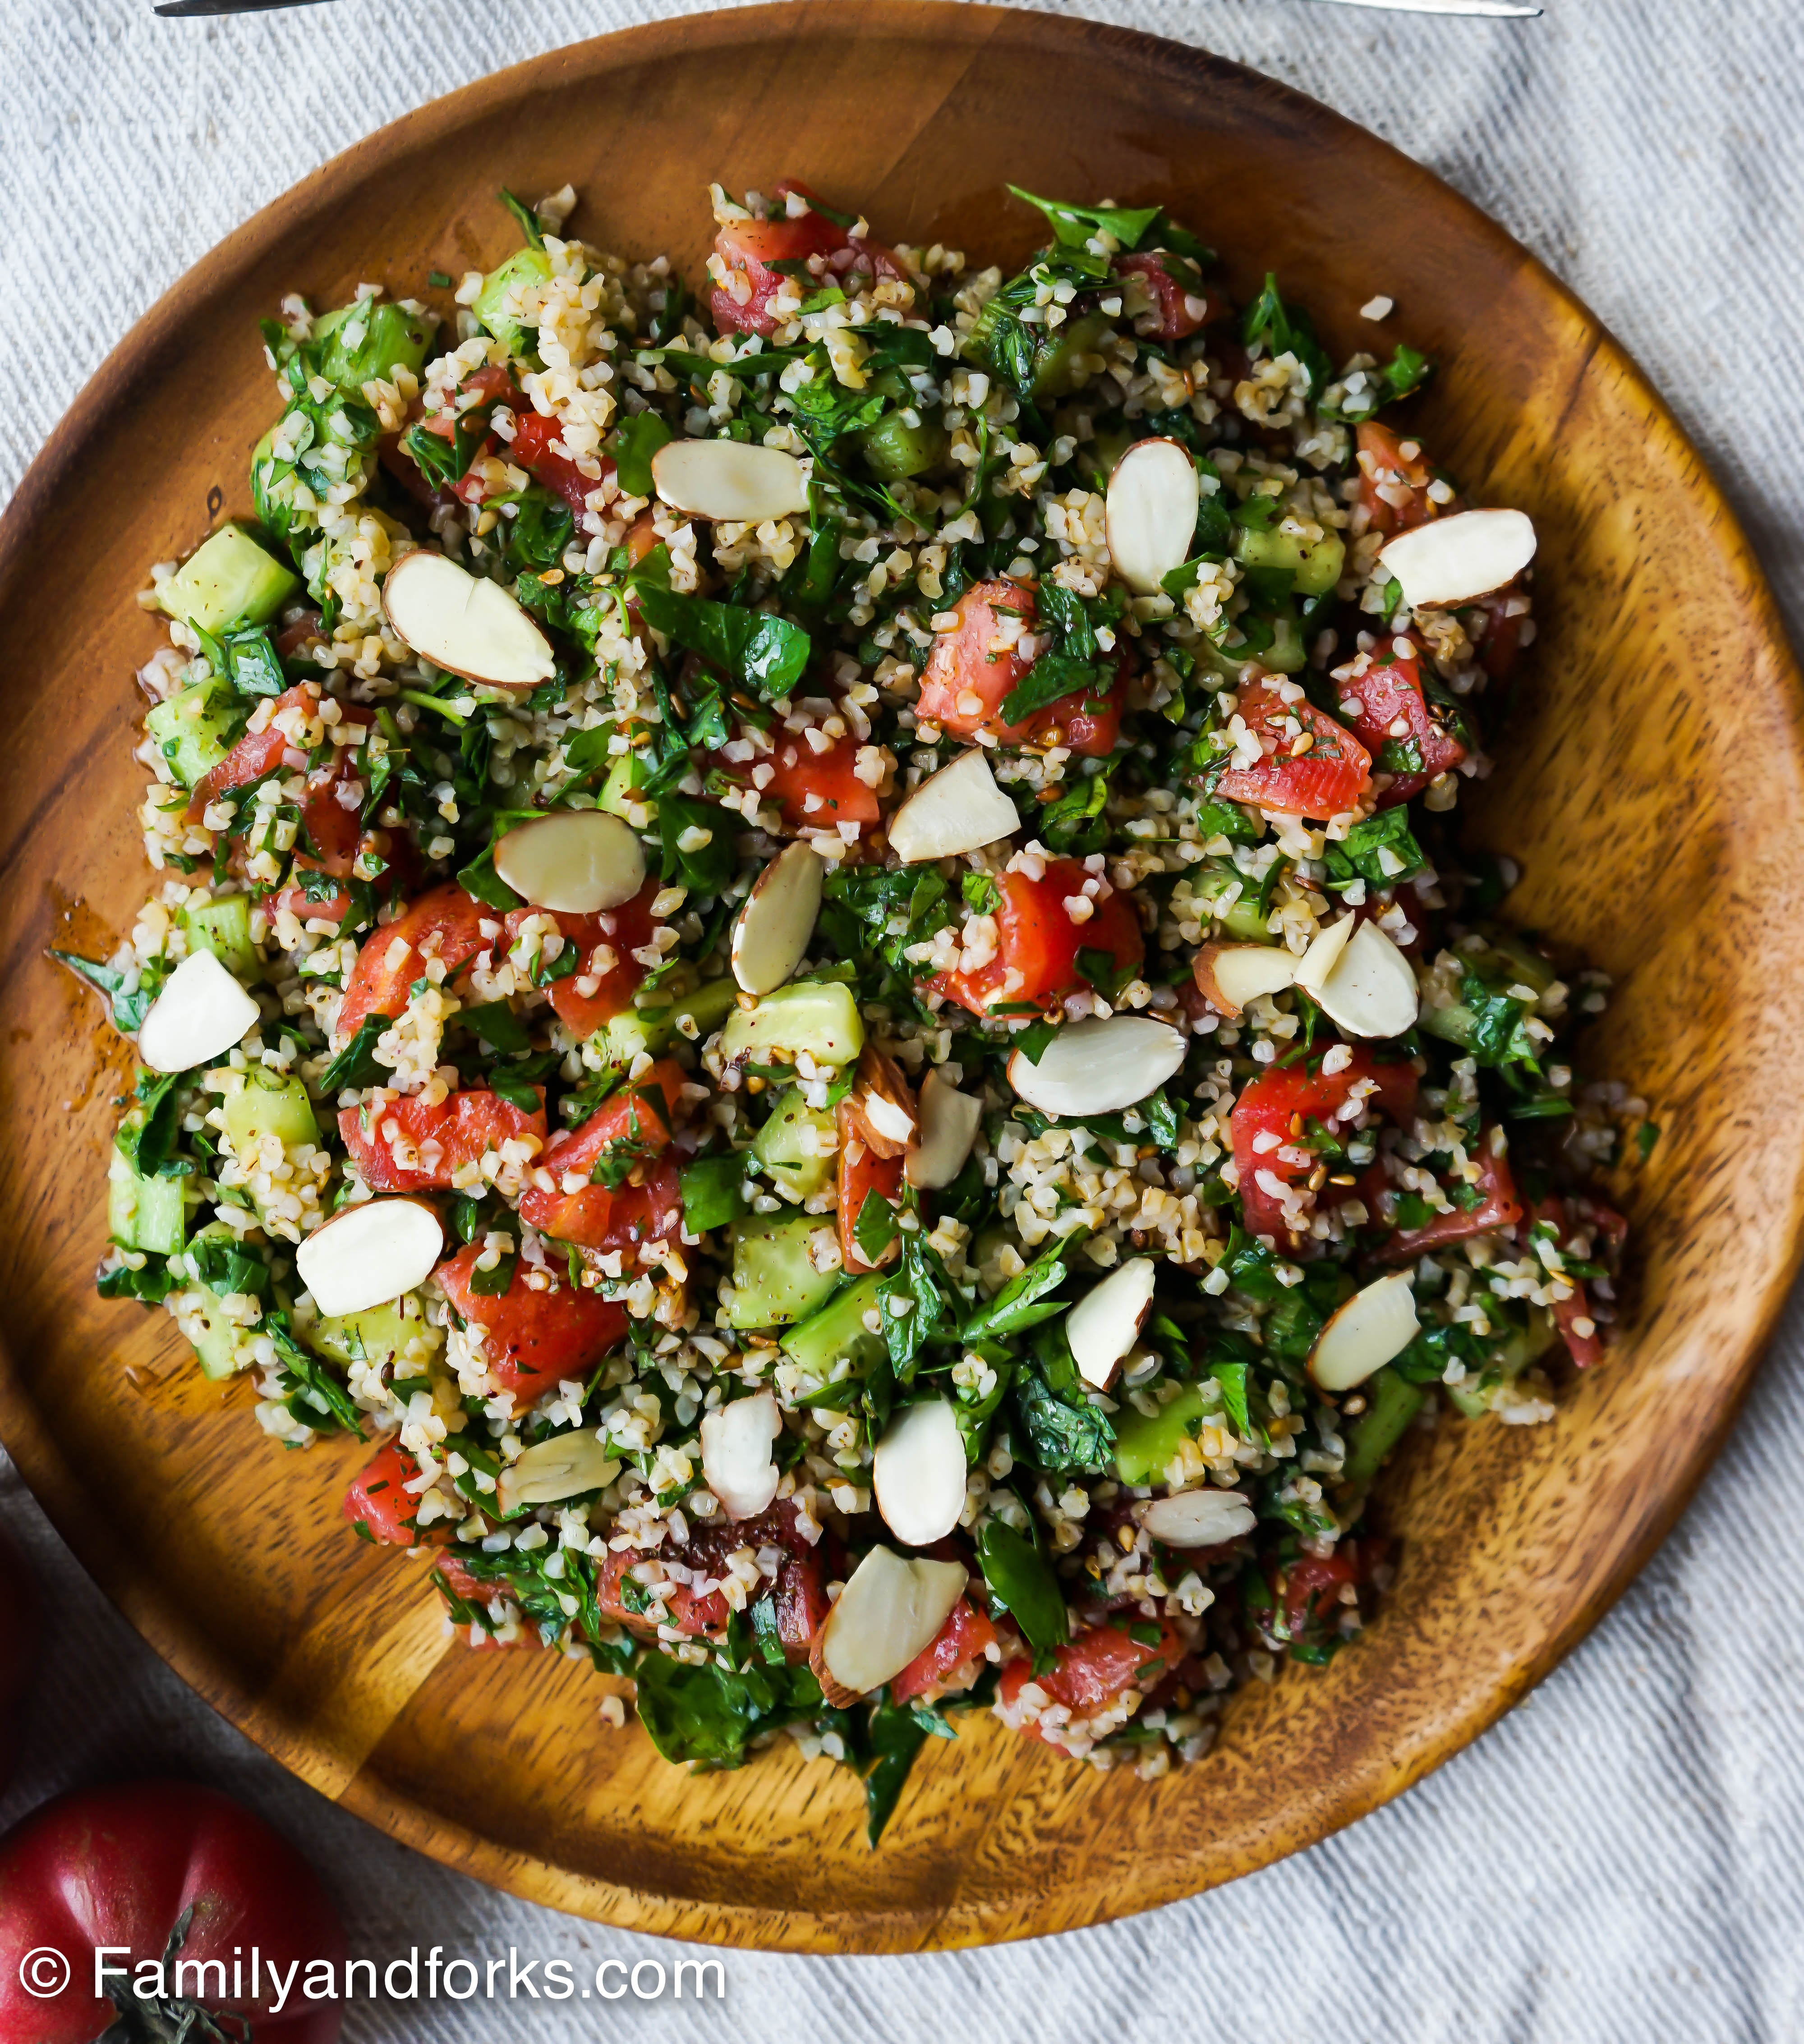
I add a handful of sliced almonds to my Tabbouleh just before serving.  You could also add goat cheese or feta to make this a little more hearty.  Adaptability and flexibility are key this summer and Tabbouleh checks all the boxes.

*I receive no compensation for mention Tyme Foods’ za’atar or Vordonia Athenolia.  I occasionally like to share new discoveries, which is part of the fun of shopping at a farmers market!

Tabbouleh with Almonds
 
Print
Fresh summer tomatoes, cucumbers, parsley and mint combined with bulghur wheat, a fresh squeeze of lemon, olive oil and a handful of sliced almonds, this Tabbouleh is a thirst quencher able to satisfy hunger on the hottest days.
Author: Lisa Colburn Stewart
Ingredients
  • ½ cup bulghur
  • ½ lb. ripe tomatoes
  • 1 medium cucumber, peeled and cubed
  • 2 bunches parsley (about 3-4 cups leaves without stems), chopped
  • 1 handful mint leaves, chopped
  • 1-2 spring onions or a small red onion, chopped
  • 1 large lemon (or more, if desired)
  • ¼ cup olive oil (or more, if desired)
  • 1-2 Tablespoons za'atar
  • Sea salt
  • 1 small head of romaine (optional)
Instructions
Prepare the tomatoes
  1. Peel the tomatoes with a serrated tomato peeler or using a sharp knife, score an "x" into the bottom and place in a heatproof bowl, pour over boiling water and let sit for a few minutes until skin begins to lift off. Remove from bowl and cool only long enough until you can handle, then pull off the skin.
  2. Cut out the core and cut tomato(es) into quarters. Scrape out the seeds.
  3. Chop tomato into cubes.
Salt the vegetables
  1. Place the tomato and cucumbers into a fine mesh strainer set over a large glass mixing bowl. Sprinkle all the cubes with salt and give a stir. Let sit in the strainer, stirring occasionally, for about 15-20 minutes. Press gently to extract as much liquid as you can without crushing. Reserve the liquid.
Prepare the bulghur
  1. Add enough water to the glass measuring cup to reach 1½ cups. Bring to a boil in the microwave or on a stove top. Add the bulghur and cover. Let sit for about 30-40 minutes until soft and fluffy.
Assemble the salad
  1. In a large bowl, mix together the cucumbers, tomatoes, parsley, mint, onions, and bulghur. Add the juice of one lemon, 1 Tablespoon of za'atar to taste (or more) and olive oil. Mix gently to combine. Adjust seasoning, if necessary by adding more lemon or za'atar.
  2. Layer a plate of romaine leaves as a bed for a salad. Or, if you have baby romaine, they make excellent scoops when serving as an appetizer.
  3. Can be served immediately or keeps well in the fridge for at least 4 days. (If using romaine lettuce, add just before serving)
Wordpress Recipe Plugin by EasyRecipe
3.5.3226


Share this:

  • Share
  • Facebook
  • Print
  • Email
  • Pinterest

Like this:

Like Loading...

Filed Under: Salads, Vegetables

Romano (Flat) Green Beans with Tomatoes and White Beans

July 14, 2017 by admin

I believe every Mediterranean country has its own summertime recipe for green beans and tomatoes.  It is a classic dish served throughout the region during the spring and summer and is most commonly prepared with Romano green beans.  While Romano green beans (also known as runner beans)  are flat and a little paler than traditional green beans, seek them out in your local farmers market. But if they are not available, this recipe is still wonderful with the bright green string beans of summer.

Many years ago we spent a week in Istanbul where every restaurant, without exception, served the exact same preparation of Romano green beans and tomatoes, and always at room temperature.  It is a dish almost identical to the Romano green beans and tomatoes served by my Italian side of the family.  When the flat green beans are in the market, this is what you make and eat until the season ends.

I sometimes think our American obsession with food can be too overwhelming and intimidating in that we feel we need to make something different with every ingredient.  Cultures that have been around much longer than ours often have one preparation for a seasonal ingredient. Romano green beans at the market?  It is always Romano green beans and tomatoes.  No need to research and try something new.  We prepare the dish as it has always been prepared.

The key to green beans and tomatoes is to abandon any desire for crisp-tender beans.  The green beans in this dish are meant to soften and meld with the tomatoes and garlic until they become almost a thick stew.  It is glorious in its simplicity.  Best made in advance, I make this dish when I return home from the market and store in the fridge to enjoy later in the week.

I’ve started to toy with tradition, adding white beans halfway through the cooking to absorb the flavors and transform this side dish into a vegetarian meal.   Whatever you decide, Green Beans with Tomatoes is a classic summer dish you will make often throughout the season and when the season ends, you won’t see it again until next year, as it should be.

Romano (Flat) Green Beans with Tomatoes and White Beans
 
Print
Author: Lisa Colburn Stewart
Ingredients
  • 2 Tablespoons olive oil
  • ¾ lb.-1 lb. green beans, (about 4 cups trimmed beans)
  • 1 1b. tomatoes (about 3 medium tomatoes)
  • 2 teaspoons fresh garlic, chopped (about 2 cloves)
  • 1 teaspoon granulated cane sugar
  • 3 teaspoons sea salt, divided
  • Handful fresh basil (about 1 cup), divided, chopped
  • 1 can of canned white or Cannellini beans, rinsed
  • Sea salt and pepper, to taste
Instructions
  1. Bring a medium pot of water to boil. Once boiling, add 1 teaspoon salt and the green beans. Cook for about 5 minutes until crisp tender, drain.
  2. Meanwhile, prepare the tomatoes. Bring a kettle of water to boil. With a sharp knife, slice an "x" in the bottom of each tomato.
  3. Place tomatoes in a heat proof bowl, pour over hot water. Let sit for about 3-5 minutes until you see the peel start to pull away. Drain tomatoes and rinse with cold water so they can be handled.
  4. Pull away the peel, remove the core and scrape out the seeds. Chop tomatoes roughly.
  5. In a large frypan, heat the oil over medium heat, add the garlic and sauté for 30 seconds.
  6. Add the tomatoes, sugar and 1 teaspoon salt. Stir to combine.
  7. Lower heat to medium low.
  8. Add drained Romano beans and half of the basil. Stir to combine.
  9. Cover fry pan and simmer gently over medium low to low heat for about 40 minutes. Check occasionally to make sure they are gently simmering and stir to break up tomatoes. Also check seasoning and more sugar or salt, if needed. The taste of tomatoes widely varies.
  10. After about 15 minutes, add the drained white beans. Stir to combine.
  11. After 30 minutes, check and if the green beans are completely soft and slightly thickened, then they are ready. If the beans retain any crispness, keep simmering. Once softened, taste and adjust seasonings with salt and pepper. Sprinkle with remaining basil.
  12. You can serve immediately but I recommend giving an additional drizzle of olive oil and storing the entire dish for later in the week. Serve at room temperature.
Wordpress Recipe Plugin by EasyRecipe
3.5.3226


Share this:

  • Share
  • Facebook
  • Print
  • Email
  • Pinterest

Like this:

Like Loading...

Filed Under: Vegetables

Early Summer Zucchini Frittata with Basil and Garlic Scapes

June 30, 2017 by admin

While I might be inclined to credit a recent trip to Italy as inspiration for today’s Zucchini Frittata with Basil and Garlic Scapes, the truth is I have been making frittatas forever and been enjoying them since childhood.  My Mom would make them often and now so do I.  A frittata also is in keeping with my desire this summer to create simple dishes that can be made in advance and are just as enjoyable hot or cold.  Or, even better, at room temperature.

Frittatas easily accommodate different vegetables, depending on the season.  I will include a recipe here but a basic technique and ratio enables you to incorporate frittatas into your routine. Soon you will make frittatas often and never with a recipe.

A must-have is a fry pan that can go from stovetop to oven.  I use a Lodge cast iron pan, which is inexpensive and indestructible.  Vegetables need to be cooked first and I almost always cook in the same pan so there is just one pan to clean.  You will need enough eggs to cover the vegetables, which is usually about 7-8 large eggs for a 10-inch pan.  The eggs also need to be beaten well until completely liquified.  This is just to ensure the frittata rises and cooks evenly.  You can give the eggs a blitz in a blender but it’s really not necessary.  Just whisk vigorously for a few minutes.

As a child, my family always enjoyed frittatas with a little side of tomato sauce.  Here is a recipe I posted a few years ago for roasted tomatoes and garlic.  At the end of the recipe, pour your roasted tomatoes and garlic with a swirl of olive oil into a blender and blitz until smooth.  Season to taste with salt, pepper and a pinch of sugar, if desired.

It’s that wonderful time of year when the options for putting dinner on the table are as unlimited as the vegetables at the market.  Enjoy it all and relax this holiday weekend.   When you have the best ingredients, keeping it simple ensures the best meals.  Happy Independence Day!

Early Summer Zucchini Frittata with Basil and Garlic Scapes
 
Print
Market fresh zucchini, garlic scape and basil merge together into an easy-to-make frittata that is best served the next day at room temperature.
Author: Lisa Colburn Stewart
Ingredients
  • 2 Tablespoons unsalted butter
  • 2-3 garlic scapes, finely chopped
  • 1 medium zucchini, thinly sliced (I use a mandoline for best results but can be sliced by hand)
  • 7-8 eggs
  • 2 Tablespoons milk
  • 1 handful basil
  • ¼ cup parmesan
  • Sea salt and pepper, to taste
Instructions
  1. Preheat oven to 400 degrees and move the rack to the top.
  2. Melt the butter in a 10-inch oven-safe fry pan over medium heat. Cast-iron pans work great.
  3. Once the butter begins to foam, add the zucchini and toss to coat with butter, add garlic scapes.
  4. Stir and turn occasionally until the zucchini slices are softened and beginning to brown, about 10 minutes. (the zucchini won't lay flat in one layer in the pan, just keep tossing gently. It will shrink and soften as it cooks)
  5. While zucchini is cooking, whisk together eggs and milk until completely combined into a thin liquid.
  6. Once zucchini is softened and beginning to brown, scatter the basil leaves over the zucchini and pour egg mixture into pan to completely cover vegetables evenly.
  7. Sprinkle evenly with the parmesan cheese.
  8. Cook on the stovetop until the eggs begin to set on the sides of the pan.
  9. Place the fry pan into the oven for about 10 minutes until the top is brown and the frittata is set.
  10. Let sit for about 10 minutes before serving. Or, even better, once cool, place into the fridge and serve the next day. Bring to room temperature before serving.
  11. Serve with a tomato sauce on the side, if desired. Click here for jarred tomato recipe that can be blitzed in a blender until smooth to form a sauce.
Wordpress Recipe Plugin by EasyRecipe
3.5.3226


Share this:

  • Share
  • Facebook
  • Print
  • Email
  • Pinterest

Like this:

Like Loading...

Filed Under: Eggs, Vegetables

English Pea, Fava and Green Bean Melange with a Lemon Garlic Scape Sauce

June 23, 2017 by admin

This week finds us just past the summer solstice marking when Spring hands over the reigns of the season to Summer. The farmers market reflects this perfect intersection.  Spring green vegetables still in their prime next to summer’s first batch of green beans.  This week, we meld Spring and Summer with an English Pea, Fava and Green Bean Melange with a Lemon Garlic Scape Sauce, scattered with radishes and spring onions.

After spending several weeks trekking through Italy, I was left with great memories of beautiful art, history, sites, and, of course, food.  Simplicity rules the meals, as it has for centuries.  Beautiful produce needs little to make a delicious meal and often what grows together, makes great sense together on the plate, too.

As temperatures and humidity continue to rise, I find I not only avoid hot meals but I never want anything stark cold either.  This dish works with any temperature but is meant to be served at room temperature when flavors really shine.  It is an almost elegant side dish that is still laid back enough to make sense aside any BBQ.  It also can be a main dish with the addition of white beans and maybe some smoked fish or best-quality tuna in olive oil.

A visit to the farmers market this summer makes it hard to say no to anything.  With this dish, we don’t need to.  It all works together in its simplicity now and always.  Mangia!

English Pea, Fava and Green Bean Melange with a Lemon Garlic Scape Sauce
 
Print
Spring and summer vegetables blend together when topped with a quick lemon garlic scape sauce and topped with thinly sliced radishes and spring onions.
Author: Lisa Colburn Stewart
Ingredients
  • 1 lb. green beans, trimmed
  • ¾ lb. fava bean pods (1/2 cup shelled fava beans)
  • ¾ lb. English pea pods (1 cup shelled peas)
  • 2-3 radishes, trimmed and sliced thinly
  • 2-3 spring onions or scallions, white and light greens sliced thinly into long strips (vertically)
  • 4-5 thin and tender garlic scapes, roughly chopped (about a ½ cup chopped)
  • 1 lemon juiced (about 2 Tablespoons lemon juice)
  • 2 Tablespoons white balsamic vinegar or white wine vinegar
  • ¼ cup olive oil, or more, if desired.
  • Sea salt and pepper, to taste
  • Large handful pea shoots or watercress leaves
Instructions
  1. Heat a large stock pot half way with water and bring to a boil. *I find it easiest to use a pot that has a strainer insert as we will be cooking the vegetables quickly in batches.
  2. Fill a large bowl with cold ice water and place on the counter, next to the pot, if possible.
  3. Remove fava beans from the pod. They will still have a shell covering the bean. When water comes to a boil, place fava beans in water and boil for about 3 minutes. Remove and place into ice water immediately.
  4. Place shelled peas into the boiling water, cook for 2 minutes.
  5. While the peas cook, gently squeeze the fava bean out of its shell jacket and place the emerald green beans into a large bowl. Discard the jacket. (I won't lie, it may seem tedious but is so worth it! A few extra family hands and this takes just a minute or two.)
  6. Using the strainer, remove peas from the water and place into the ice bath.
  7. Place green beans into the hot water. Cook for 5 minutes or until crisp tender.
  8. Using a slotted spoon, remove peas from ice water and add to the fava beans in the large bowl.
  9. Remove green beans and place into ice water (you may need to add a little more ice)
  10. Remove from the ice bath to a dry towel and mop up any excess moisture. No need to be thorough, they just shouldn't be dripping wet.
  11. In a blender, combine the chopped garlic scapes, lemon juice, vinegar and olive oil
  12. Blend on high until garlic scapes are almost completely dissolved. The result will be a thick sauce. If you like, add additional olive oil to thin into more of a vinaigrette.
  13. Season to taste with salt and pepper.
  14. To serve, place green beans on a plater and scatter with the pea and fava bean mix. Toss with the pea shoots and scatter radish and scallions on top. Drizzle with a bit of the sauce and serve remaining sauce on the side. Or, you can toss it all as a salad.
Wordpress Recipe Plugin by EasyRecipe
3.5.3226


Share this:

  • Share
  • Facebook
  • Print
  • Email
  • Pinterest

Like this:

Like Loading...

Filed Under: Salads, Vegetables

Strawberry Sauce with Garlic Scapes and Rosemary

June 2, 2017 by admin

Cooking with fruit is a lovely way to utilize the farmers market.  Fresh strawberries warmed with vinegar and served over hot, hopefully fatty plump pork chops, is an ideal pairing.  Most farmers markets not only feature fruit and vegetables but also the freshest meat, responsibly raised.

I could go on….and I would….but as the cabin doors close, I must close as well.   Hope to be sending new Market ideas gathered from our travels!  Happy Market day!

Pork Chops with a Strawberry Sauce with Garlic Scapes and Rosemary
 
Print
Author: Lisa Colburn Stewart
Ingredients
  • 1 pint strawberries, remove stems and slice berries
  • 2-3 sprigs rosemary
  • 2-3 Tablesooons balsamic vinegar
  • 1 Tablespoons local honey
  • 2 tablespoons, plus 1 tablespoon unsalted butter
  • 2-3 garlic scapes, remove any rough ends and chop
  • 4 thinly sliced boneless pork chops (or seafood or seasoned tofu.)
Instructions
  1. In a medium saucepan, mix together strawberries, vinegar, honey and rosemary. Bubble gently and stir until strawberries begin to breakdown and sauce becomes syrupy.
  2. Remove from heat and set aside. Season to taste adding additional vinegar and honey, if necessary . (The sweetness of balsamic can vary widely...and so can one's preference for sweetness.)
  3. Heat 2 tablespoons butter in a cast iron or other large fry pan.
  4. When foaming, add pork chops and brown on each side until golden and interior temperature reaches 150 degrees. Remove chops to a plate and keep warm. (I usually cover with another plate.)
  5. In the fry pan, melt the 1 Tablespoon butter over medium heat. Add the garlic scapes and sauté until softened, about 3-4 minutes.
  6. Remove the rosemary from the sauce and discard. Spoon sauce into fry pan and stir to combine and heat through with the scapes.
  7. Pour sauce over pork chops to serve.
Wordpress Recipe Plugin by EasyRecipe
3.5.3226


Share this:

  • Share
  • Facebook
  • Print
  • Email
  • Pinterest

Like this:

Like Loading...

Filed Under: Uncategorized

Grilled Asparagus with Green Herb and Hard Boiled Egg Vinaigrette

May 26, 2017 by admin

I first appreciated and recognized seasonal eating about 15 years ago while visiting Europe in the Spring.  Every night, at every restaurant, the specials were shared, and no matter where we went, the list ended with great reverence as they told us about the very special asparagus season, particularly white asparagus.   The asparagus was always served with a hard-boiled egg and parsley vinaigrette, often prepared table side.

I loved this celebration of the season and respect for tradition.  They celebrated the arrival of asparagus as a very special event, savored the season with traditional preparation, and let go of the season when asparagus stopped appearing at the market.  When a vegetable is out of season, you wait until next year.

So it is with this reverence that we celebrate the asparagus season another week with Grilled Asparagus drizzled with a Green Herb and Hard Boiled Egg Vinaigrette.  This dish is perfect hot or cold and is a very special side dish for any BBQ main served this weekend.  It also travels well.  Grill the asparagus in advance and prepare the vinaigrette, then drizzle just before serving.  It is best at room temperature.

In a deviation from European tradition, mint is added to Italian flat leaf parsley.  I like the spring kick it provides and, as anyone who has ever grown mint can appreciate, you will always have an abundance at hand as it grows like a predatory weed.

So, celebrate the opening season to summer and the tapering season of the asparagus.  Then take a moment and remember what this weekend is really all about.  A salute and deep bow of appreciation and remembrance for those who sacrificed so much to protect us throughout history.

We will be remembering Grandaddy who bravely flew helicopters during the Vietnam War, and recently departed Uncle Pete who, at the age of 18, stepped off a boat on the Normandy coast and made it home alive, never able to discuss his experiences for another 50 years.  The bravery of these men humbles me.  I hope to never face the horrors they have seen and I will take this weekend to remember that the life I enjoy today carries a very heavy weight by all of those who fought to protect it.

Now….go enjoy your asparagus…while it is still here.

Grilled Asparagus with Green Herb and Hard Boiled Egg Vinaigrette
 
Print
Grilled asparagus topped with a classic European-style vinaigrette featuring fresh herbs and farm-fresh hard-boiled eggs.
Author: Lisa Colburn Stewart
Ingredients
  • 1 lb. fresh asparagus, remove rough ends and rinse
  • 4 scallions or spring onions, ends and rough tops removed, finely chopped
  • 1 cup loosely packed Italian flat leaf parsley, finely chopped
  • ½ cup loosely packed mint leaves, finely chopped
  • 1 Tablespoon capers in brine, drained (or may substitute chopped cornichon pickles or dill pickles), roughly chopped
  • 2 teaspoons (or more, to taste) white wine vinegar or sherry vinegar
  • 1 teaspoon dijon mustard
  • 2 hard boiled eggs (about 15 minutes to make sure yolk is fully cooked and almost powdery)
  • 1 cup olive oil
  • Salt and pepper, to taste
Instructions
  1. Coat the asparagus spears in oil and season with salt and pepper.
  2. Grill over hot grill until lightly browned but still holding their shape. (Or, you can grill in a griddle on a stovetop or broil in a 400-degree oven.)
  3. While the asparagus is cooking, remove the egg yolks and place in a bowl with the vinegar and mustard. Mash the yolks together with the vinegar and mustard until smooth.
  4. Chop the egg whites finely and set aside.
  5. While stirring constantly, whisk in the olive oil. Blend until emulsified. (Or, you can place it all in a mason jar to shake to combine, or use a hand-held blender.)
  6. Add the parsley, mint, egg whites, scallions, capers and gently stir.
  7. Add salt and pepper to taste, and more vinegar, if desired.
  8. To serve, drizzle vinaigrette over asparagus and put the vinaigrette in a bowl with a spoon on the table for guest to add more (and they will add more!)
Wordpress Recipe Plugin by EasyRecipe
3.5.3226

Share this:

  • Share
  • Facebook
  • Print
  • Email
  • Pinterest

Like this:

Like Loading...

Filed Under: Vegetables

Pasta Primavera with English Peas and Pea Shoots

May 19, 2017 by admin

When Spring English Peas make their appearance in the market, Pasta Primavera makes its way to our table…often.  It is a rather elegant name for a rather basic dish consisting of spring vegetables and pasta.

Today was a steamy day, more like summer, so cream is a bit much right now, although it is the traditional way to make this dish.  Against the simple backdrop of a best-qualilty pasta, market-fresh Spring vegetables sing with all their color, texture and flavors in this simple Pasta Primavera.

The season for fresh Spring English Peas is not very long and the peas that do make their way to the end of the season become oversized and mealy, best suited for a soup than enjoyed in their glorious simplicity as they do in this dish, or in salads.  Tender spring peas won’t last long in your kitchen either.  It’s best to store them in the fridge and use quickly.

English pea pods can look a little dusty and gritty but their rough exterior belies the gems they contain.  Try to select medium size pea pods that are rounded out by the peas.  Some smaller pods were picked too early and do not contain mature peas.  Large pea pods contain the mealy peas described above.

While effort is required to shell the peas, it’s not really time consuming and the rest of the preparation is minimal.  Simply snap off the stem and pry open, removing the string along the seam, if necessary, then run a finger or thumb along the seam to loosen the peas into a bowl.

Pea shoots make its way into this dish, as well.  I add them just at the end so they can remain crisp to add a little texture and retain their fresh, clean taste that seems distinctly spring.

I provide a recipe below but use it only as a guide and you’ll soon gather the confidence to make the dish your own.  Spring in in the air and now it’s on your plate.  Enjoy it all while it lasts.

Pasta Primavera with English Peas and Pea Shoots
 
Print
Fresh English peas, baby carrots, asparagus and pea shoots strewn through pasta with a spring garlic sauce feature the best spring vegetables in a dish that is easy to prepare
Author: Lisa Colburn Stewart
Ingredients
  • ¼ lb asparagus, ends trimmed
  • ¼ lb. spring carrots (or any carrots), peeled and sliced into long narrow slices
  • 1¼ cups shelled peas (or frozen)
  • 1 large spring garlic (or 2 garlic cloves and a small shallot), remove dark green tough ends and chop light green and white into a small dice
  • 5-6 stems fresh thyme or 2 teaspoons dried
  • 2 Tablespoons unsalted butter
  • 4 Tablespoons olive oil, plus more to taste
  • ¼ cups of parmesan cheese, or more to taste
  • 10 oz dried spaghetti or favorite pasta (about ¾ of a 1-lb. box)
  • 2 Tablespoon sea salt, plus more for seasoning to taste.
  • Black pepper, to taste.
Instructions
  1. Put a large pot of water to boil while you prep the vegetables.
  2. In a large fry pan over medium heat, melt the butter with the 2 Tablespoons olive oil.
  3. Add the spring garlic and gently cook for 3 minutes, lowering heat if necessary.(Iit should make a gentle sizzling sound.)
  4. Add the shelled peas and thyme sprigs and cook over medium to medium low heat for about 5 minutes. Stirring occasionally to coat peas with the butter sauce.
  5. Once the water reaches a rolling boil, add the 2 Tablespoons salt and add the pasta, giving a stir. Cook pasta according to directions, adding the carrots to cook for the last 5 minutes and the asparagus for the last 2 minutes with the pasta. (for example, if your directions suggest to cook pasta for 10 minutes, add the carrots after 5 minutes and the asparagus after 8 minutes. ) Keep testing pasta as it should still have a little bite, "al dente."
  6. Remove the carrots and asparagus to a plate and drain the pasta. Add pasta to the fry pan to toss with the pea and garlic mixture, adding olive oil as needed to coat the pasta completely. Add ¼ cup parmesan cheese and salt and pepper, to taste.
  7. To serve, place a tangle of pasta in a bowl, add spears of asparagus and carrots and top with a small handful of pea shoots.
Wordpress Recipe Plugin by EasyRecipe
3.5.3226


Share this:

  • Share
  • Facebook
  • Print
  • Email
  • Pinterest

Like this:

Like Loading...

Filed Under: Pasta and noodles, Vegetables

Dutch Baby Pancake Topped with Greens and Strawberries with a Rhubarb Vinaigrette

May 12, 2017 by admin

Mother’s Day is a challenge where the pressure is high but honestly, expectations are low.  A sane breakfast at home is really the best gift and a Dutch Baby pancake couldn’t be easier.  Topped with greens, strawberries and a drizzle of a Rhubarb Vinaigrette, this is an elegant brunch dish fresh from the farmer’s market that will make a big impression on Mom….and anyone else at the table.

Rhubarb is still in the farmers markets even though I could not find it in the grocery stores.  When foraging for stalks at the market, look for the reddest stalks you can find.  Almost all farms will remove the leaves before selling,  if your leaves are still attached, remove and discard.  They can be toxic.

Strawberries make their first appearance at the market and will bear no resemblance to grocery strawberries sold year-round.  Local strawberries are smaller and juicier with a floral sweetness that makes them just as appropriate in salads as they are in desserts.  Try to find organic strawberries, if you can.  We are lucky in Great Falls to have an organic source.  Strawberries are susceptible to pests and are commonly sprayed.  If you have any doubts, rinse the berries with water in a colander for a few minutes to help wash away any residue.

Only rinse strawberries you intend to use immediately.  Washed strawberries will not last long, nor will your fresh market strawberries.  However, once washed, I find it helps to remove the strawberry tops, slice into quarters and toss with a little sugar.  I keep a bowl in the fridge and find the berries last several days longer than raw strawberries.

Making a Dutch Baby Pancake couldn’t be easier and suits both sweet and savory appetites.  It just take a blitz of a few ingredients in a blender then a hot oven takes care of the rest.

Impress your Mom and give this a try.  You’ll impress yourself, as well.  There is no better gift than the ability to serve something lovely and enjoy it together.  Happy Mother’s Day to all!

Dutch Baby Pancake Topped with Greens and Strawberries with a Rhubarb Vinaigrette
 
Print
Savory dutch baby pancake topped with arugula, watercress and a rhubarb vinaigrette is an easy yet elegant brunch entree using fresh Spring market ingredients.
Author: Lisa Colburn Stewart
Recipe type: Savory Dutch Baby Topped with Greens, Strawberries and a Rhubarb Vinaigrette
Cuisine: Brunch
Ingredients
For the Dutch Baby Pancake
  • ½ cup flour or gluten-free 1-to-1 flour (gf)
  • ½ cup milk or favorite non-sweetened dairy substitute (v)
  • 2 eggs or egg substitute (v)
  • ¼ teaspoon sea salt
  • 1-2 Tablespoons unsalted butter
For the Rhubarb Vinaigrette
  • 3-4 stalks rhubarb stalks, ends removed, cut into thin slices
  • 2 Tablespoons local honey
  • ¼ cup water
  • 1-2 Tablespoons white wine vinegar
  • ½ cup olive oil
  • sea salt to taste
For the Greens and Strawberry Salad
  • 2 handfuls of baby arugula
  • 1 small handful watercress leaves and tender stems
  • 1 large handful strawberries, leaves removed and cut into quarters or halves if small.
Instructions
  1. Preheat the oven to 425 degrees.
  2. Place an oven-safe 10-inch fry pan (standard cast iron pan works great) into the oven while preheating.
  3. Into a blender, place the milk, eggs, flour and salt, in that order. Pulse a few times, scrape down the sides and then blitz until completely blended and smooth. Set aside. (you can also use a food processor, stand mixer or electric mixer but it is laborious to mix by hand as the batter should be completely smooth. This takes just a few moments with any of the above electric mixers.)
  4. While the oven preheats, place the rhubarb into a saucepan with the honey and water over medium heat and stir occasionally until the rhubarb completely breaks down. Set aside to cool a bit.
  5. When the oven is preheated, carefully remove the hot fry pan and add the butter quickly so that it covers the bottom and sides. (I just use a knife to swirl it around). Immediately add the batter to cover the pan evenly and place back into the oven. Cook for 20 minutes, checking periodically. It is done when the edges are dark brown and the center is light brown and puffed. (When you remove, you might feel as if you have grown an alien but be assured, it will deflate once it sits.)
  6. While the pancake is cooking, make the vinaigrette. Place the rhubarb mixture into a blender with the vinegar, blend until smooth. While blending, pour in olive oil in a small but steady stream. Taste and season with salt to taste.
  7. Remove pancake from oven and let deflate for a few moments. Toss greens with vinaigrette.
  8. Add greens and strawberries to the top of the pancake. Garnish with mint, if desired.
  9. Serve immediately.
Wordpress Recipe Plugin by EasyRecipe
3.5.3226


Share this:

  • Share
  • Facebook
  • Print
  • Email
  • Pinterest

Like this:

Like Loading...

Filed Under: Salads

Spring Asparagus, Garlic and Mushroom Bruschetta with Mint and a Rhubarb Mint Julep

May 5, 2017 by admin

It might be the Kentucky Derby just around the corner or the fact that rhubarb was next to mint in the market but this is what makes sense to me this week.   I think it is what’s needed for this stormy weekend… particularly the bourbon.

Rhubarb is a bit of a forgotten fruit.  It is rarely sighted at the grocery store these days as it requires a bit more love, that is to say, effort, to bring out its best.  At the market, it is a bargain and after just a little tending, it becomes something almost exquisite.  Citrusy sour without the bitterness, I think it is perfectly suited as a thirst quenching drink.  Sipped slow, this Rhubarb Mint Julep is a very bright start to an otherwise dreary weekend.

After a few sips of a cocktail, we will contemplate the beauty of the horses and begin to place our bets amongst each other.

It’s time for a snack.  Fresh vegetable bruschetta is an easy way to pull together a quick appetizer and make good work of market vegetables.

Crisp Spring green asparagus is paired with the mild warmth of spring garlic and a quick toss of chopped mint.  It’s really a spring vegetable hash that when spooned onto toast and topped with mint, looks almost elegant and tastes distinctly springlike.   I make extra to keep in the fridge to fill an omelette the next day for Sunday breakfast.

The rain will likely continue and so will our afternoon stretch into evening.  It’s a good day for bourbon and a rainy day for horses but we take it all in good stride.  It’s that kind of day.

Cheers!

Asparagus, Spring Garlic, Mushroom and Mint Bruschetta
 
Print
A quick sauté of spring asparagus, garlic and mushrooms touched with a kick of mint on a toasted baguette.
Author: Lisa Colburn Stewart
Recipe type: Appetizer
Ingredients
  • ½ baguette
  • 6-7 sprigs of asparagus
  • 4-5 medium to large cremini mushrooms
  • 4 spring garlic stems (or 2-3 garlic cloves)
  • ⅓ cup mint leaves
  • 2 Tablespoons butter
  • 1-2 Tablespoons olive oil
  • Salt and pepper to taste
Instructions
  1. Preheat oven to 400 degrees or the broiler to low (you can do high broil to make your toast but keep an eye on it constantly. The difference between nicely browned and burnt takes about 2 seconds....seriously. Go ahead and turn it down to low broil if you have that setting on your oven. I do this in batches using a toaster oven.
  2. Slice the baguette into thin ¼-inch slices and spread out onto a sheet pan.
  3. Prep the garlic: Remove the root end and about a half inch of the green tops of all the garlic stems. Remove the white bulb of one garlic stalk and set aside. Add its greens to the rest of the stems. Cut the remaining stems into small slices, then run the knife through the pile so that you have a small dice.
  4. Prep the asparagus: Remove the tough end, usually at least an inch off the bottom. Cut stalks into small slices, then run the knife through the pile to create a small dice.
  5. Prep the mushrooms: wipe any dirt off with a wet paper towel and cut off the stem. Set the mushrooms flat on the cutting board. Slice through the center like a hamburger roll, then holding it together, slice in about 3 slices, then three times the other direction until you have a small dice of mushrooms. Run your knife through one more time so that the pieces are similar in size to the asparagus.
  6. Prep the mint: Pull out the smallest leaves and set aside. Put 4-5 mint leaves on top of one another and roll together lengthwise like a cigar. Starting at the point, slice into thin slices to create a chiffonade. Repeat with the remaining leaves.
  7. Heat the butter in a large fry pan over medium heat until it melts. Add the asparagus and stir the asparagus for about 2-3 minutes until it starts to turn bright green. Push the asparagus to the edges of the pan with a wooden spoon or silicone spatula to create a space in the center. Add the mushrooms and stir for a few minutes until covered in the butter, then stir together with the asparagus. Add the garlic.
  8. Continue to gently sauté for about 7-10 minutes until the asparagus is softened and the mushrooms are starting to brown. Remove from heat and add the mint. Stir to combine until mint begins to wilt.
Make the toast:
  1. Take your remaining garlic bulb, slice in half lengthwise. Rub the open side of the garlic against the bread slices. Drizzle or brush olive oil over each toast and broil or toast in an oven just until light brown.
  2. Remove from oven.
  3. Scoop a spoonful of the mushroom asparagus mixture onto each toast. Garnish a few of your bruschetta toasts with any small mint leaves you had set aside.
Wordpress Recipe Plugin by EasyRecipe
3.5.3226

Rhubarb Mint Julep
 
Print
Author: Lisa Colburn Stewart
Ingredients
  • 1 lb rhubarb stalks
  • ½ cup sugar
  • 1 cup filtered water
  • 16 mint leaves
  • 4 oz. bourbon (optional)
  • 1 11-oz bottle sparkling water
Instructions
  1. Remove the ends of the rhubarb and cut into 1-inch pieces.
  2. Place rhubarb pieces into a medium saucepan, sprinkle with the sugar and pour in the water.
  3. Bring to a slow simmer over medium heat, occasionally scraping down the sides with a heatproof spatula to incorporate any stray grains of sugar and assist its dissolve into the water.
  4. Simmer gently until the rhubarb softens and completely breaks apart.
  5. Remove from heat and let cool for a few minutes.
  6. In the meantime, set a fine mesh strainer over a large glass measuring cup or bowl.
  7. In batches, pour about half of the rhubarb mixture through the strainer and using your spatula, press the rhubarb pulp against the strainer to press out all liquid into the bowl. Remove pulp into a glass jar with a lid and repeat with the remaining rhubarb mixture.
  8. You now have a beautiful glass full of rhubarb syrup and a jar full of rhubarb preserves that will last a least a week in the fridge. Slather the rhubarb preserves over a slice of buttered toast or spoon over ice cream or yogurt.
  9. In the bottom glass or pitcher, muddle the mint leaves with a muddler or end of a wooden spoon to bruise the mint, releasing its mintiness.
  10. Add a scoop of ice, 3 Tablespoons of rhubarb syrup per glass (or ¾ cup for the pitcher) or more and the bourbon (1 oz per glass...or more if desired!). Stir to combine.
  11. Serve in a tall glass with a sprig of mint and a straw.
Wordpress Recipe Plugin by EasyRecipe
3.5.3226


Share this:

  • Share
  • Facebook
  • Print
  • Email
  • Pinterest

Like this:

Like Loading...

Filed Under: Uncategorized

Asian Mixed Greens with a Warm Spring Garlic and Beet Vinaigrette

April 21, 2017 by admin

This time of year, the weather is bit unpredictable.  Today it is sunny and 85 degrees, tomorrow 60 and rainy.  Regardless of what the day brings, the market is featuring a beautiful collection of Asian spring greens, as well as our first sighting of spring garlic and a small supply of baby beets.

Asian Greens with a Warm Spring Garlic and Beet Vinaigrette blends the cool with the warm, which seems to make sense with the indecision of the season.  Beet greens are the star in this salad instead of the small root attached, although it will serve an important role.  I prefer beet greens with a little heat while baby napa cabbage and baby bok choy are too tender and best raw.

Rinse these tender farm-fresh greens in a bowl covered with cold water then swirl around with your hands a few times.  Let rest just a minute to allow any grit to sink to the bottom of the bowl, just a minute or so. Then, carefully lift the floating greens out of the water and either wrap in a clean towel or give a few whirls in a salad spinner to remove excess moisture.

Spring garlic resembles spring onions with a distinct difference as the taste and smell is distinctly garlic.  Unlike the pungent traditional dried garlic found in the grocery, market-fresh Spring garlic has a delicate flavor that won’t overwhelm any dish.

The beet is cubed and sautéed with their greens and some spring garlic in toasted sesame oil.  Just as the greens begin to release, a drizzle of soy sauce, rice wine and honey finish this simple vinaigrette.  It is poured still warm over the cold greens.  Together the warm with the cool suit our days and our appetites, regardless of the weather.  It’s not confusion, it’s Spring.

Asian Mixed Greens with a Warm Spring Garlic and Beet Vinaigrette
 
Print
A warm soy vinaigrette is tossed with fresh baby bok choy and baby napa cabbage.
Author: Lisa Colburn Stewart
Ingredients
  • 1 baby beet with greens attached, peeled and chopped into small cubes
  • 4-5 Spring garlic bulbs (the same size as scallions, usually only found at the farmers market)
  • 1 small head of baby napa cabbage
  • 2 handfuls baby bok choy
  • 2 Tablespoons toasted sesame oil
  • 1½ teaspoons soy sauce
  • 2 teaspoons rice vinegar
  • 1½ teaspoons honey
  • 2-3 Tablespoons sesame seeds or slivered almonds (optional)
Instructions
  1. Remove beet greens from the beet and cut off the end of the napa cabbage.
  2. Rinse all greens and dry wrapped in a towel or using a salad spinner. Cut into bite-size pieces.
  3. Remove roots from spring garlic and the top 2 inches of the greens, chop small, reserve 1 Tablespoon of greens and whites and set aside.
  4. Put the sesame oil, beets and remaining spring garlic in a medium frypan over medium heat and saute 5 minutes until beets slightly soften.
  5. Add the beet greens and saute until just beginning to wilt.
  6. Meanwhile, place the bok choy and napa cabbage into a salad bowl.
  7. Add soy sauce, vinegar, honey to the pan and stir until the honey is dissolved.
  8. Pour warm vinaigrette over the greens, toss to combine. After plating, top with reserved Tablespoon of garlic and sesame seeds or almonds, if desired.
Wordpress Recipe Plugin by EasyRecipe
3.5.3226


Share this:

  • Share
  • Facebook
  • Print
  • Email
  • Pinterest

Like this:

Like Loading...

Filed Under: Salads

  • « Go to Previous Page
  • Go to page 1
  • Go to page 2
  • Go to page 3
  • Go to page 4
  • Go to page 5
  • Interim pages omitted …
  • Go to page 7
  • Go to Next Page »

Primary Sidebar

Subscribe to Family and Forks

Enter your email address to receive seasonal recipes from the farmers market

Archives

Vegetables

Spring Vegetable Soup

roasted carrots on plate

Maple Roasted Carrots with Goat Cheese and Herbs

Carrot and Ginger Orange Soup

Cabbage and Carrots with Rice Noodles (Pancit)

See More→

Thanksgiving Favorites

Butternut Squash Soup with Crispy Kale and Chili-Roasted Seeds
Cranberry Orange Chutney
Apple and Pear Salad with Apple Cider Vinaigrette

Maple Roasted Carrots with Goat Cheese

  • Bloglovin
  • Email
  • Instagram
  • Pinterest

Archives

familyandforks

Spring Vegetable Soup celebrates the season’s fr Spring Vegetable Soup celebrates the season’s freshest vegetables.  It is easy to make and comforting, which I think hits just the right note for all of us these days.  Best of all, most of the ingredients can be sourced from your local farmers markets.  Local farms and the farmers markets have done a remarkable job finding safe ways to share the freshest spring vegetables and farmers market favorites.  Click link in profile for a recipe and a list of tips and resources to support your local farmers and eat local.  #eatlocal #farmersmarket
It time to show our love to an often overlooked wi It time to show our love to an often overlooked winter farmers market staple, the sturdy (and you might say studly) cabbage.  Even during the coldest months, cabbage makes a strong showing in a winter farmers market. While it is often overlooked, this versatile vegetable is packed with valuable vitamins and minerals and can sub into so many dishes depending on your mood (or desire). We shred red cabbage and enjoy raw in a salad with a light white vinegar vinaigrette, chopped parsley and roasted walnuts.  Other times, we shred red and/or white cabbage and toss into a quick stir fry. (We add walnuts to that, too.) Even if we don't use our cabbage right away, it stays reliably sturdy and fresh in the fridge until you decide to show it some well deserved attention.  Sturdy, reliable and there when you need it, what more can you ask for?  It's time to show a little ♥️. #happyvalentinesday #cabbage #howiwinter  #seasonaleating  #inseasonnow #farmersmarket #farmtotable #eatlocal #farmfresh #eattherainbow #gloobyfood #farmtofork #feedfeed #f52farmstand #farmersmarketinspo #tastespotting #foodspotting  #thekitchn #foodgawker #f52grams #huffposttaste #foodblogfeed #wholefoods #edibledc #vafoodie #insidevirginia #eatloco #vafarmersmarkets #vamarketstories
Anyone who thinks a farmers market is just for sum Anyone who thinks a farmers market is just for summer hasn’t visited @shenandoahseasonal at the DuPont Circle, Silver Spring or Leesburg farmers markets this winter.  An amazing display of color, variety and flavor.  If you are missing this, you are missing out..really you are.  Click link in profile to find a list of winter farmers markets in DC, VA and MD.  Not local?  Look up a winter farmers market in your area.  You may be surprised...the list of markets open year-round continues to grow everywhere.  So much hard work in the harshest conditions.  It is deeply appreciated by those of us who enjoy the winter bounty. 🙏🏻 #howiwinter #wintermarket @loudounfarmmkts @freshfarmdc
These are not exotic sea creatures...but an exquis These are not exotic sea creatures...but an exquisite box of mushrooms from @kingmushroom15. Mushrooms are one of my favorite winter farmers market treats and these beauties are spectacular.  I will roast my king oyster mushrooms tonight with olive oil and garlic, then top with freshly chopped market parsley.  Tomorrow’s breakfast is a Mushroom and Kale Toast.  Click on the link in profile to access recipe in the blog archives. 🍄#winterfarmersmarket #mushrooms #dupontcircle #freshfarmdc #dupontcirclefarmersmarket  #edibledc #washingtondc #washingtonianmag
Beautiful options from the Saturday farmers market Beautiful options from the Saturday farmers market.  We stuffed the zucchini blossoms with goat cheese whisked with seasoned herb oil, then fried in a light batter for a luxurious start to a family lunch.  First we shop, then we feast. 😋 #howisummer #familymeal #farmfresh #zucchiniflowers #farmtotable #markethaul #f52farmstand
Lately we keep piles of tomatoes on our counter in Lately we keep piles of tomatoes on our counter in bowls and platters, which I always stop to admire.  We grab 🍅 to toss into almost every dish...last night it was a vegetable curry and for lunch today, a fresh tomato sauce over pasta.  Click link in profile to find both recipes in the archives.  It is such a simple luxury to savor the season. ❤️🍅 #tomatoes #summertomatoes #farmtotable #farmfresh
Shiny hot peppers....they are just spectacular in Shiny hot peppers....they are just spectacular in the markets these days.  I am throwing hot peppers into everything...sauteed with potatoes and eggs, onto the grill, or in a sauce for pasta.  To us, they are the stars of the season right now. 💫🌶 #freshpeppers #hotpeppers #farmersmarket #markethaul
A little Charlie Parker and a lot of tomatoes went A little Charlie Parker and a lot of tomatoes went into this tomato salad. 🍅#summertomatoes #tomatoes #basil #f52august #farmtotable #howisummer
This was our Sunday family lunch @haaitza. We arr This was our Sunday family lunch @haaitza.  We arrived earlier than check-in so we walked across the street for a family lunch at the hotel’s cafe. Although delicious, it wasn’t the finest meal of our journeys (that would be impossible to narrow down) but its simplicity and the opportunity to share the meal together as a family made it special. Roast garlic chicken with fresh green beans, salad and a plate of frites to share together. Relaxed, simple but chic and convivial in every sense. The hotel kindly rushed to ready our rooms but we could have stayed here all day. (A! 👌🏻 ❤️ 🇫🇷 #hotelhaaitza #haaitza #france #pylasurmer #arcachon #bassindarcachon #sundaysupper #travelwithteens #familytravel #familymeal
We took a ferry across the Bay of Arcachon to Cap We took a ferry across the Bay of Arcachon to Cap Ferret, which is surrounded by oyster beds. We immediately rented bikes to tour the peninsula and visit the traditional oyster village, L’Herbe.  #bassindarcachon #capferret #oysters #travelwithteens #familytravel
This is the perfect way to start a trip on the Bay This is the perfect way to start a trip on the Bay of Arcachon.  The bay hosts over 700 acres of oyster beds producing 8,000-10,000 oysters per year.  We plan to view some oyster action tomorrow by bike.  Today, we eat.  #oysters #arcachon #france #pylasurmer #bassindarcachon
This weekend’s farmers market score. It is offi This weekend’s farmers market score.  It is officially summer!  Eggplant, zucchini and yellow squash with some tomatoes beginning to appear on market tables.  We put almost all into an easy ratatouille for dinner last night but it’s the leftovers we are really after...so good warmed or cool over greens for lunch, or wrapped in a crepe.  Recipe available in my blog archives through link in profile.  Cheers to the new season! 🍅 #ratatouille #inseason #farmtotable #eatlocal
Green beans picked yesterday will be on our table Green beans picked yesterday will be on our table tonight.  I’m thinking of blanching with other vegetables from this weekend’s market and serving with an aioli for dipping.  I just read a simple recipe in @bonappetitmag May issue.  Great use of local farm fresh eggs, too! 👌🏻💕#farmersmarket #farmtotable #f52farmstand #bonappetit
We scored at the farmers market today! A perfect We scored at the farmers market today!  A perfect spring market day. 🥕 #farmersmarket #f52farmstand #food52
One of my favorite aspects of shopping at the farm One of my favorite aspects of shopping at the farmers market is the opportunity to talk to the farmers growing my food. I find much more comfort knowing what is and...more importantly...what is not sprayed on our fruits and vegetables.  #farmersmarket #f52farmstand #eatlocal #talktoyourfarmer
Spinach Salad with a Strawberry-Rhubarb Vinaigrett Spinach Salad with a Strawberry-Rhubarb Vinaigrette is straight from the farmers market to the plate this week. I find it is best to go to the farmers market without a recipe but instead buy what looks best and inspires you.  Click link in profile for the recipe. Also check out familyandforks’ new Vegetable Guide on the blog with info on how to select, store and prep your farmers market vegetables.  It is organized by season and we will continue to update. Wishing everyone a weekend filled with inspiration and remembrance. 🇺🇸
Spring greens are in full bloom at the farmers mar Spring greens are in full bloom at the farmers market this week.  So excited to find garlic scapes (far right). They are almost only available at the farmers market. I keep finding new ways to enjoy these gems and will share more ideas soon.  I also found beautiful broccoli flowering sprouts that I plan to sauté with some chopped garlic scapes.  Vegetables that grow together tend to taste great together, too.  Nature works wonders in many ways. 🌱#farmersmarket #spring #f52farmstand #f52grams #vafarmersmarkets #visitvirginia #edibledc
The first strawberries I have enjoyed this season The first strawberries I have enjoyed this season are not from the market but from the gorgeous vision of @begonamortonstudio at this year’s Great Falls Spring Art Fest. Spectacular! 🍓🤩 •••••#greatfallsva #strawberries #springtime #art #begonamorton #begonamortonstudio #oilpainting #artistsoninstagram #artoftheday #artwork #artist #instaart
This week at the market it’s all about the ramps This week at the market it’s all about the ramps!  Grab them while you can....their season is very short but, for me, their appearance marks the start of spring.  Ramps are a delicate balance of garlic and spring onion and can be used in their entirety...leaves and bulbs.  Chop and sauté to add to an omelette.  Make a pesto in the blender by adding a handful of walnuts, olive oil, a pinch of salt and pepper then thicken with some parm cheese.  Or, char a bit on the grill just before serving as a side dish.  The options are endless, their season is not.  Enjoy while you can!🌱 ••••#ramps #spring #farmersmarket #restonfarmersmarket #virginiafarmersmarkets #eatlocal #shoplocal #familyandforks
Asparagus is here in all its beautiful shades....n Asparagus is here in all its beautiful shades....not just green.  Market-fresh asparagus snaps crisply with a fresh grassy taste of spring.  Its delicate nature makes it well paired with a simple sauce...melted butter with chopped garlic ...or if you are lucky to forage some ramps...finish with a squeeze of lemon and you have a delicate side dish that will pair with almost everything. 😋🌱. #asparagus #spring #farmersmarket #springishere #familyandforks
Follow on Instagram
This error message is only visible to WordPress admins

Copyright © 2025 FamilyandForks on the Foodie Pro Theme


Loading Comments...
 

    %d